Table of Contents
BIPLUS Installation Guide
Pre-requisites
- Minimum 1 GB free space on a server.
- Minimum 1 GB of RAM.
- Windows Operating System XP/Vista/7/2003 Server/ 2008 Server/2012 Server etc.
- User Account on the server that has the privileges to install software and configure services.
- BIPLUS Software/Setup files.
- An available port on the host that is NOT being used by any other service, nor is likely to conflict with other services (the BIPLUS default port is 8123).
Installation Summary
This document will guide the installer in the following tasks:
- Installing the Java Runtime Environment.
- Installing Tomcat server.
- Configuring and starting up Tomcat Server.
- Installing BIPLUS web archive (BIPLUS.WAR) file onto Tomcat Server.
Run BIPLUS.exe setup file to start the installation process. If you do not a have BIPLUS.exe file then please Contact us for that.
Once you run the BIPLUS setup file, you will see a window as shown below. Click 'Next' button to Continue…

On clicking the 'Next' button you will see BI PLUS information page which will give you a brief overview about installation process
Again click the 'Next' button to Continue…
On the next page, please review the License Terms carefully. If you accept the terms of the agreement, click 'I Agree' to continue…

Now you will see the window as shown below. Here you can select list of components to intall.
Check the components you want to install and uncheck the components which you do not want to install.
- Selecting J2SE Runtime Environment will install Sun J2SE environment 6.0(1.6.0_32).
- Selecting Apache Tomcat will install Apache Tomcat 7.0.27 web application server.
- Selecting Deploy web application will deploy BIPLUS web application to Apache Tomcat.
'Space Required' will vary based on the components selected.
Click the 'Next' button once you are done with component selection.

If you want to install BIPLUS in a destination other the than default location, select the 'Browse' button to choose the location of your choice, otherwise click on 'Next' button to continue…

In the next window, choose a Start Menu folder for the BIPLUS shortcuts and Click on the 'Next' button to continue…
The next screenshot show the Java install location. The default location is C:\BIPLUS\Java\jre-6u32. Click 'Next' to continue.
Now you will see the Apache Tomcat Advanced Options window which contain the following fields:
- Install Location is the location where Tomcat will be installed.
- Windows service name is the service name for BIPLUS tomcat.
- HTTP Port is the port number for the BIPLUS application. Use the port number given by your Network Admin to ensure there are no conflicts.
- Admin Password is the password used to manage Apache Tomcat.

In the Web Application Advanced Options dialog, enter your windows machine password and Click 'Next' to continue…
In the next dialog, leave Name and Hostname as it is. Click 'Next' to continue…
In the Summary dialog, you can review the installation details before proceeding to installation. Click the 'Install' button to start the installation process.

Once installation in complete, you will see the Installation Complete confirmation in the current dialog, with the message Setup was completed successfully. Click 'Next' and then the 'Finish' button to close BI PLUS setup window.
Once setup is finished, the BI PLUS login window is opened automatically. The default Login is admin and the default password is adminpass.
If these credentials do not work, then contact your System Admin.

Once you login with a valid username and password, then inside BI PLUS you will see the Reports Tree, Editor, Viewer and Menus. (see image below)

Configuring and Starting up Tomcat Server
To configure Apache Tomcat, open the Apache Tomcat Properties dialog. This can be achieved by running Start ⇒ All Programs ⇒ BI PLUS ⇒ BI PLUS Home ⇒ Tomcat ⇒ Configure Tomcat
Right click on the Configure Tomcat icon and select Run as Administrator to open Apache Tomcat Properties as an administrator.
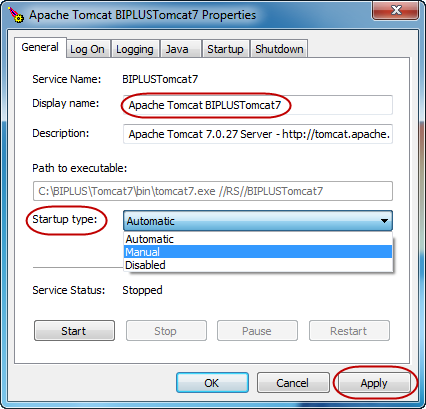
Display Name: In the General tab of Apache Tomcat Properties window, you can change the display name of the Tomcat service. (Note: Changing the display name will not change original service name.)
Startup Type: You can also change Startup Type.
- Automatic will start BI PLUS service automatically on every Operating System startup. [Recommended]
- Setting this to Manual means that you will need to start BI PLUS service manually each time that the Operating System is started.
- Disabled will disable this service.
Click on the Apply button to save the changes without closing the Apache Tomcat Properties window.
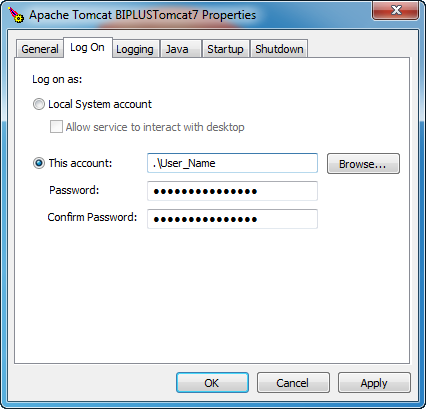
In the Log On tab of Apache Tomcat Properties window, we recommend that you to enter a username and system password that has full Administrator rights on the host.
Click the OK button to save and close the Apache Tomcat Properties dialog.
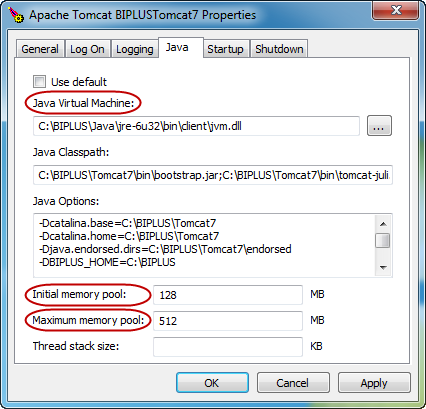
Using the Java tab of Apache Tomcat Properties window, you can configure Java Virtual Machine and Tomcat's memory.
- Java Virtual Machine: If you have a different version of JAVA installed then you can select your desired Java version using this feature.
- Initial Memory Pool: Using this you can set the minimum amount of memory Tomcat is to start with. Default is 128 MB.
- Maximum Memory Pool: Using this you can set the maximum amount of memory for Tomcat. Default is 512 MB
Tomcat will release any memory not used, but it will maintain the amount of memory configured in ‘Initial memory pool’ as its minimum operating memory.
Click on the OK button to save and close Apache Tomcat Properties window.
Note:
1. Never set the maximum memory pool to more than the amount of real memory.
2. Also remember to account for memory that is used by other things like the operating system, databases and other applications.
Installing BIPLUS.WAR file into Tomcat Server
There might be some situations when you already have Tomcat installed and want to install BI PLUS on the existing Tomcat server as an additional application. For situations like this, you can easily deploy BIPLUS.WAR file into the Tomcat server. All you need is Tomcat Manager's credentials to deploy the BIPLUS.WAR file.
Open your browser and enter the IP address where Tomcat is installed and its port number. e.g. http://192.168.2.1:8123. If Tomcat is installed on port 8123 of the host machine, then you can use http://localhost:8123. In the following image, the address bar shows a hyperlink to open the Apache Tomcat console.

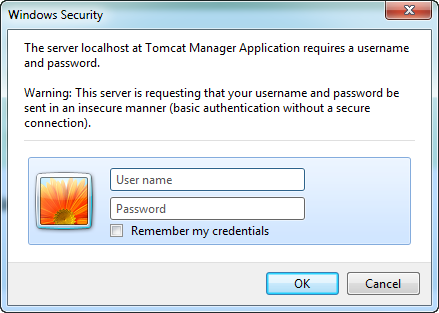
Click on Manager App (highlighted in the above screen-shot). Performing this will ask for manager credentials. (see image below)
Enter User Name and password with manager role to login.
If you have forgotten what username and password you created for your tomcat manager account, navigate to C:\BIPLUS\Tomcat7\conf\tomcat-users.xml and view the credentials for role manager-gui. Please refer to the following screen-shot for the same. The highlighted area shows Username and Passwords for Manager role.
15
Once you are logged into Tomcat manager, you will see the list of installed applications that are running and being serviced by the Tomcat application server listening on port 8123 (or whatever port Tomcat was installed on). Next, scroll down in the Tomcat Manager page to the point where you see the section WAR file to deploy This is where the BIPLUS.WAR file will be installed into the application server.
- Select BIPLUS.WAR file using the Browse button and click on the Deploy button to deploy the BIPLUS.WAR file. (Refer image below)

Clicking the Deploy button will deploy BIPLUS.WAR application into Tomcat Server. You should see the confirmation message ‘OK’ letting you know that the WAR deployment itself was successful. You should also then see BIPLUS as the application that is now running as a Tomcat Webapps application. You will also notice that using tomcat manager, you can Stop, Reload, Undeploy the BIPLUS application. You do not need to install BIPLUS repository manually or manually configure BIPLUS application with Tomcat server.
